
Welcome to Haploo!
Here is your Getting Started tutorial to help you get set up with our plugin software. We will be creating a very simple "Hello World" solution to get you acquainted with our plugin functions. We will only be focusing on minimum setup configuration for this quick example project.
Follow these steps to get started:
1. Register a haploo account
- To create an account with haploo, head to https://sync.haploo.com/register.
- You will be taken to a page asking you to enter further details. Please proceed with creating your account.
- Once you have completed the your account and configuring your billing options, navigate to the account management dashboard.
- Collect your Haploo Platform API Keys from your dedicated account dashboard.
Example of API Key Information (Single Tenant) :
For multiple tenant hosting accounts, you'll generate the API Key Information on a per tenant basis.
This single key will create a dedicated sync domain. You do have a few limited options for filtering down this sync broadcast.
2. Download & Install the latest Haploo plugin version
- Go download the latest version of the plugin at https://sync.haploo.com/download.
- To start configuring your solution, you'll need to at a mininum install the MacOS Haploo Sync Plugin.
- Install Path is : /Applications/FileMaker Pro 18 Advanced/Extensions/[HERE]
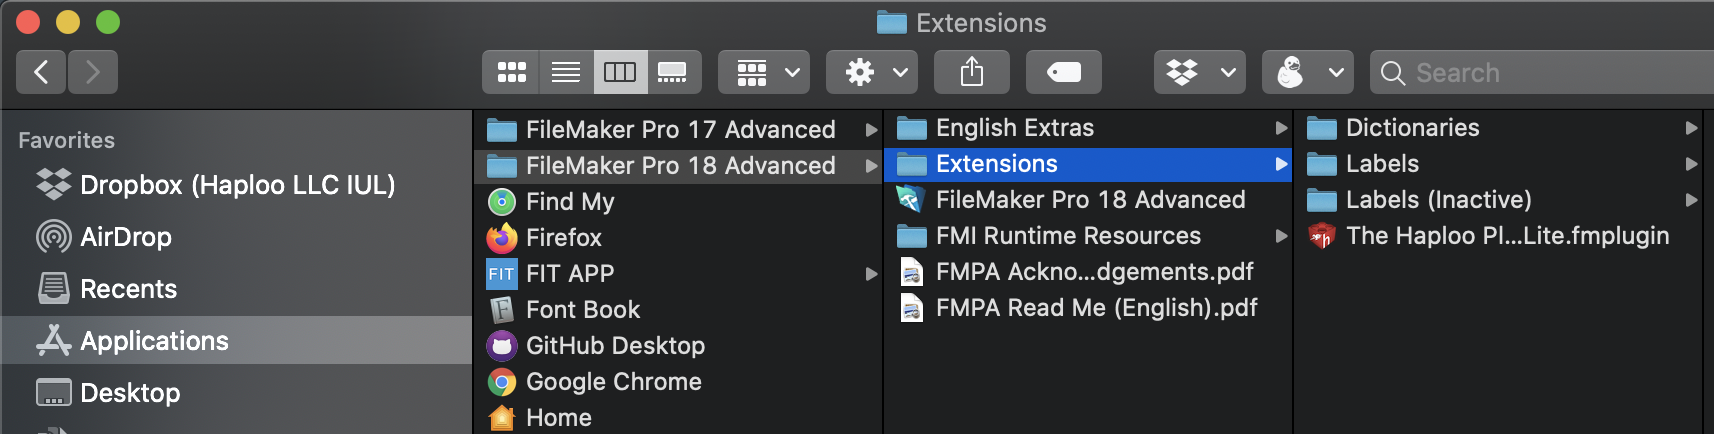
- Ensure FileMaker is closed before copying, or reboot FileMaker Pro.
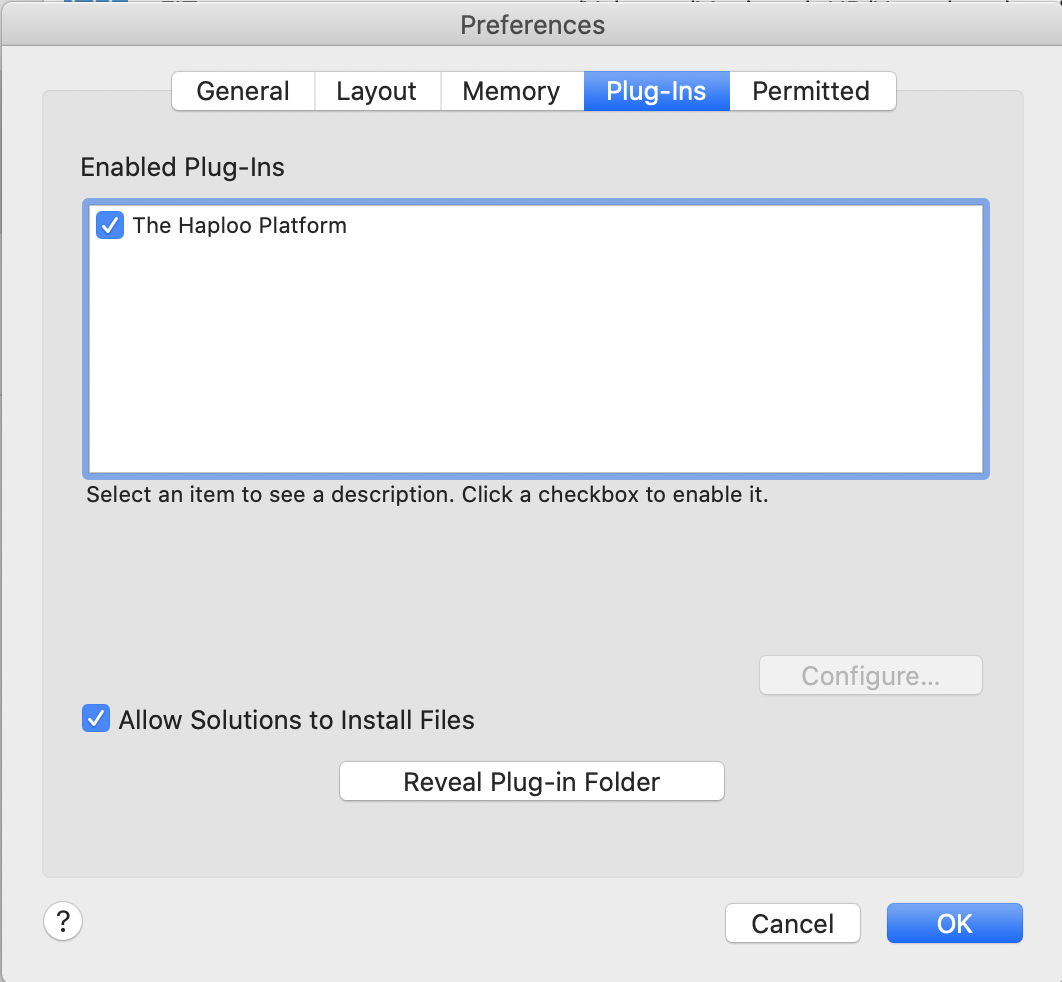
- To confirm the install when well, open FileMaker, navigate to: FileMaker Pro Advanced Menu > Preferences > Plug-Ins Dialog Box. (You should see the enabled plug-in)
3. Create a new solution from a FileMaker Starter Solution
We will use this starter solution to create a simple example for installing sync. We will need to add three critical functions into the solution to ensure the core components of sync will work properly. Once you master, these three sync functions below you will master haploo sync. We will be using the Contacts starter solution that installs along with FileMaker Pro 18. Finally, we will just be saving the Contacts.fmp12 file in a folder on our desktop named Contacts App.
4. Find a home for the HaplooRegister() function.
This function will create the connection to the haploo cloud for your specific API Key. The best place to run the HaplooRegister() function is in the solution's startup script or a script the runs during the ** On First Window Open** script trigger found within the File Options dialog. Really, it can be called from anywhere as long as the function fires prior to any record changes. Typically, you'll also want to call it, after your users complete any authentication / login processes. The Haploo Platform will log account names and priviledge sets for each post commited to Haploo Cloud.
Below is an example of this functions usage / syntax. The function provides a JSON Configuration Payload that provides the Haploo Plugin with specific instructions on how to connect to your Haploo Cloud Endpoint. Keep in mind the JSONSetElement() is a built-In FileMaker Pro function, and is only available in FMP version 18+.
     HaplooRegister(
             JSONSetElement ( "{}" ;
             [".API_Endpoint"    ; webEndPoint                          ; JSONString]; // Endpoint From Haploo fro the provider's resources.
             [".API_Token"       ; tenantID                             ; JSONString]; // API Token From Haploo for the Provider to use
             [".Client_Secret"   ; tenantSecret                         ; JSONString]; // Client Secret From Haploo for the Provider to Use
             [".Provider_ID"     ; "22f66f26ac514a6e9ae68b9aac762ff1"   ; JSONString]; // The Provider is Haploo's Billing Subscriber.
             [".Tenant_EndPoint" ; webEndPoint                          ; JSONString]; // How your app connects to our cloud.
             [".Tenant_ID"       ; tenantID                             ; JSONString]; // A Sync Domain or Customer Group.
             [".Tenant_Label"    ; tenantName                           ; JSONString]; // A Sync Domain or Customer Group.
             [".Tenant_Secret"   ; tenantSecret                         ; JSONString]; // A Customer's Secret of a Haploo Subscriber
             [".Solution_Name"   ; tenantName                           ; JSONString]; // A cool name to desribe your build/deployed APP
             [".API_Version"     ; "static"                             ; JSONString]; // [ static ; dynamic ] Dynamic is schema healing
             [".PushOption"      ; "Disable"                            ; JSONString]; // [ Enable ; Disable ] Can contain push msg logic
             [".PushUserTags"    ; "False"                              ; JSONString]; // [ $$List[] ; False ] Can contain push tags
             [".SyncTriggers"    ; $$HAPLOO_SYNC_TRIGGERS                             ; JSONObject]; // Triggers from above for when sync happens
             [".ExcludePrefix"   ; "_"                                  ; JSONString]; // Comma Seperated List of Field Prefixes to Exclude
             [".ExcludeGlobal"   ; "Enable"                             ; JSONString]; // [ Enable ; Disable ] Enable = Do not sync Global Field
             [".PullPolicy"      ; $PullSecurity                        ; JSONObject]  // Definition of the logged in user's pull request rights.
             )//END OF JSON SET
     )//END OF HAPLOO REGISTER
Now, define the SyncTriggers key from the previous code block with the preferred sync triggers configuration json object. We typically place the HaplooRegister Function inside a Let() statement. Then we define either a global variable or a local variable with the sync triggers JSON object. This configuration object determines when syncing events should occur:
      $$HAPLOO_SYNC_TRIGGERS = JSONSetElement ( "{}" ;
            [".PullToRefresh"    ; True ; JSONBoolean]; //A Manual Sync Trigger
            [".SyncOnSuspend"    ; True ; JSONBoolean]; //When uses leave app (Not Force Quit And Not Exit Application Script Step
            [".SyncOnOpening"    ; True ; JSONBoolean]; //When user first opens their app from sleeping or first logs into app.
            [".SyncAfterEdit"    ; True ; JSONBoolean]; //When user modifies any record at all in their app. All sync occurs.
            [".SyncAfterAPN"     ; True ; JSONBoolean]; //When a user sees a message like "Your order is ready" trigger the sync
            [".SyncOnSilentAPN"  ; True ; JSONBoolean]; //When another devices triggers a silent push on editing rec. Think iMessage
            [".BackgroundFetch"  ; True ; JSONBoolean]; //iOS Randomly Allows App Time For Syncing, Must have proper auth timeouts
            [".SyncOnTimeChange" ; True ; JSONBoolean]) //Sync at midnight or on significant time change
5. Configure the Database Schema for Sync & Posting
Now, that your solution can make a successful connection to your haploo cloud backend as a service, you need to make a few minor database schema changes to accurately post the record changes that your users will produce will using your solution.
- Ensure that each table that you want to sync in your solution has a properly configured Primary Key Text Field. This key must be Globally Unique. Haploo Sync does not support auto-increment serial keys. As these keys will not reliably link record changes from asynchronously connected devices. In our contacts sample database, we will start by configuring the contacts table found in the File > Manage > Database.. Dialog Window. Select the Fields tab.
1. Configure the Table's Primary Key (Auto UUID field) or make adjustments to an existing primary key field.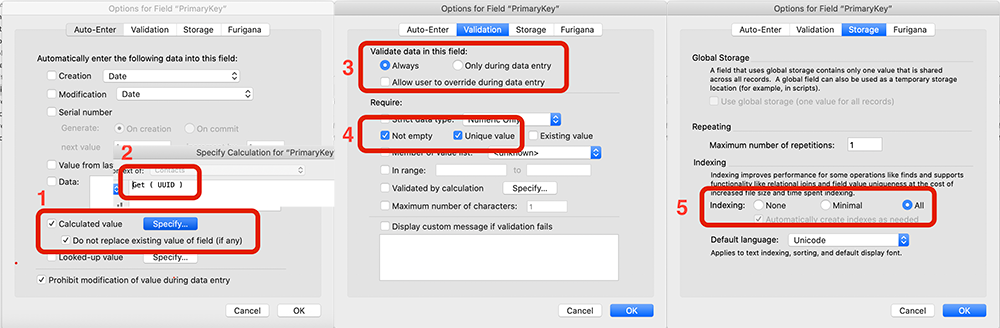
2. After setting up a proper primary key, add a new TEXT field called _HaplooSync, but really you may create any field that you'd like. Configure this new field with a Validated By Calculation function. This function will fire when any record is validated after being created or modified. The Haploo Plugin will collection information about the record and generate a SQL Statement Representation of what just occured. This statement along with other informational properities about the record event will be saved in a local cache sqllite store until it can be upserted to the Haploo Cloud.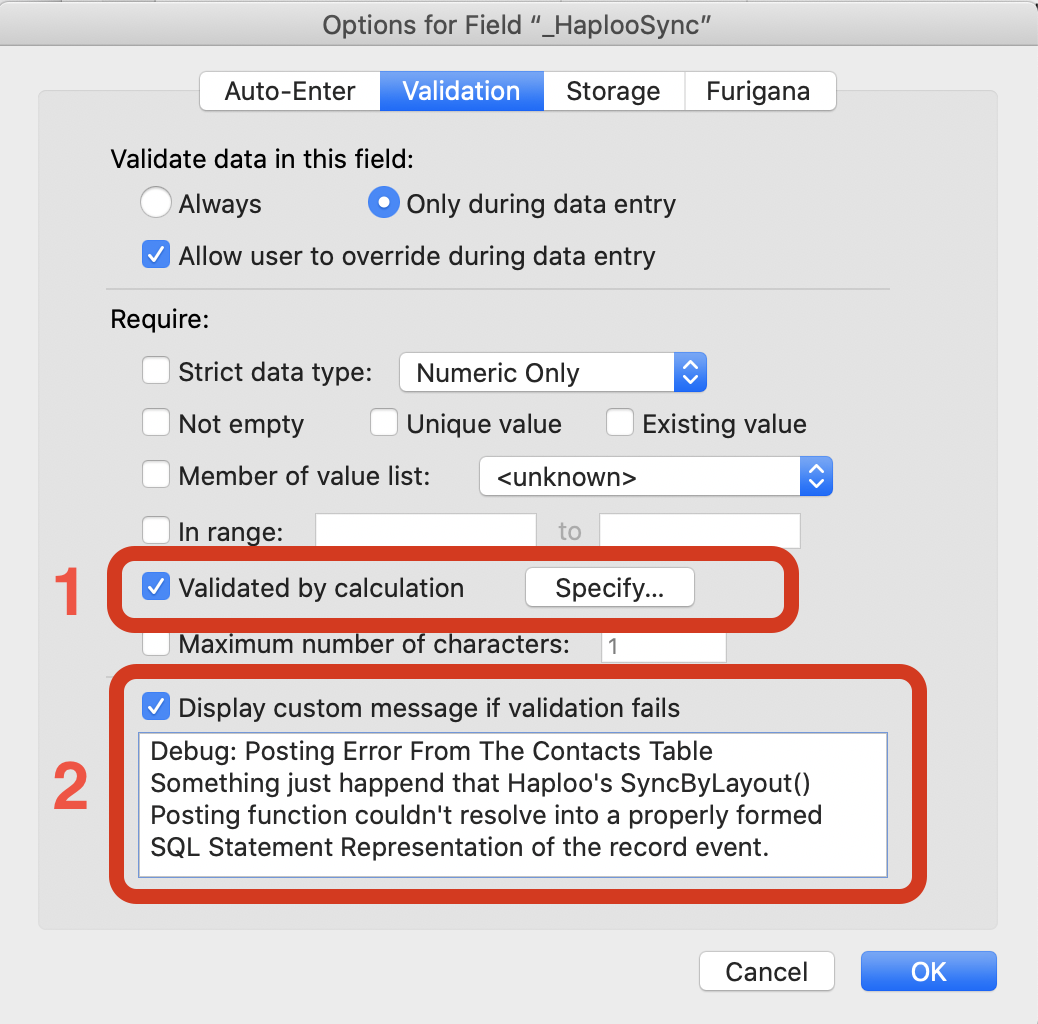 DebuggingWe like to add a validation message (No.2 ) to help guide us in the debugging process. If the data your solution produces and sends to Haploo's SyncByLayout() function can't be parsed into a properly formed SQL Statement, validation will fail. An example is when a FileMaker Number Field has text in it.
- Click the Specify... button to configure these sync posting options in the calculation window. We currently offer three different modes for collecting and posting record creation and edits to the plugin. In this example we are using the SyncByLayout which uses a predefined FileMaker Layout to reference when evaluating which fields you'd like to use for the post activity. We cover these "posting mechanisms" functions in more detail HERE link to HaplooSyncPost Functions
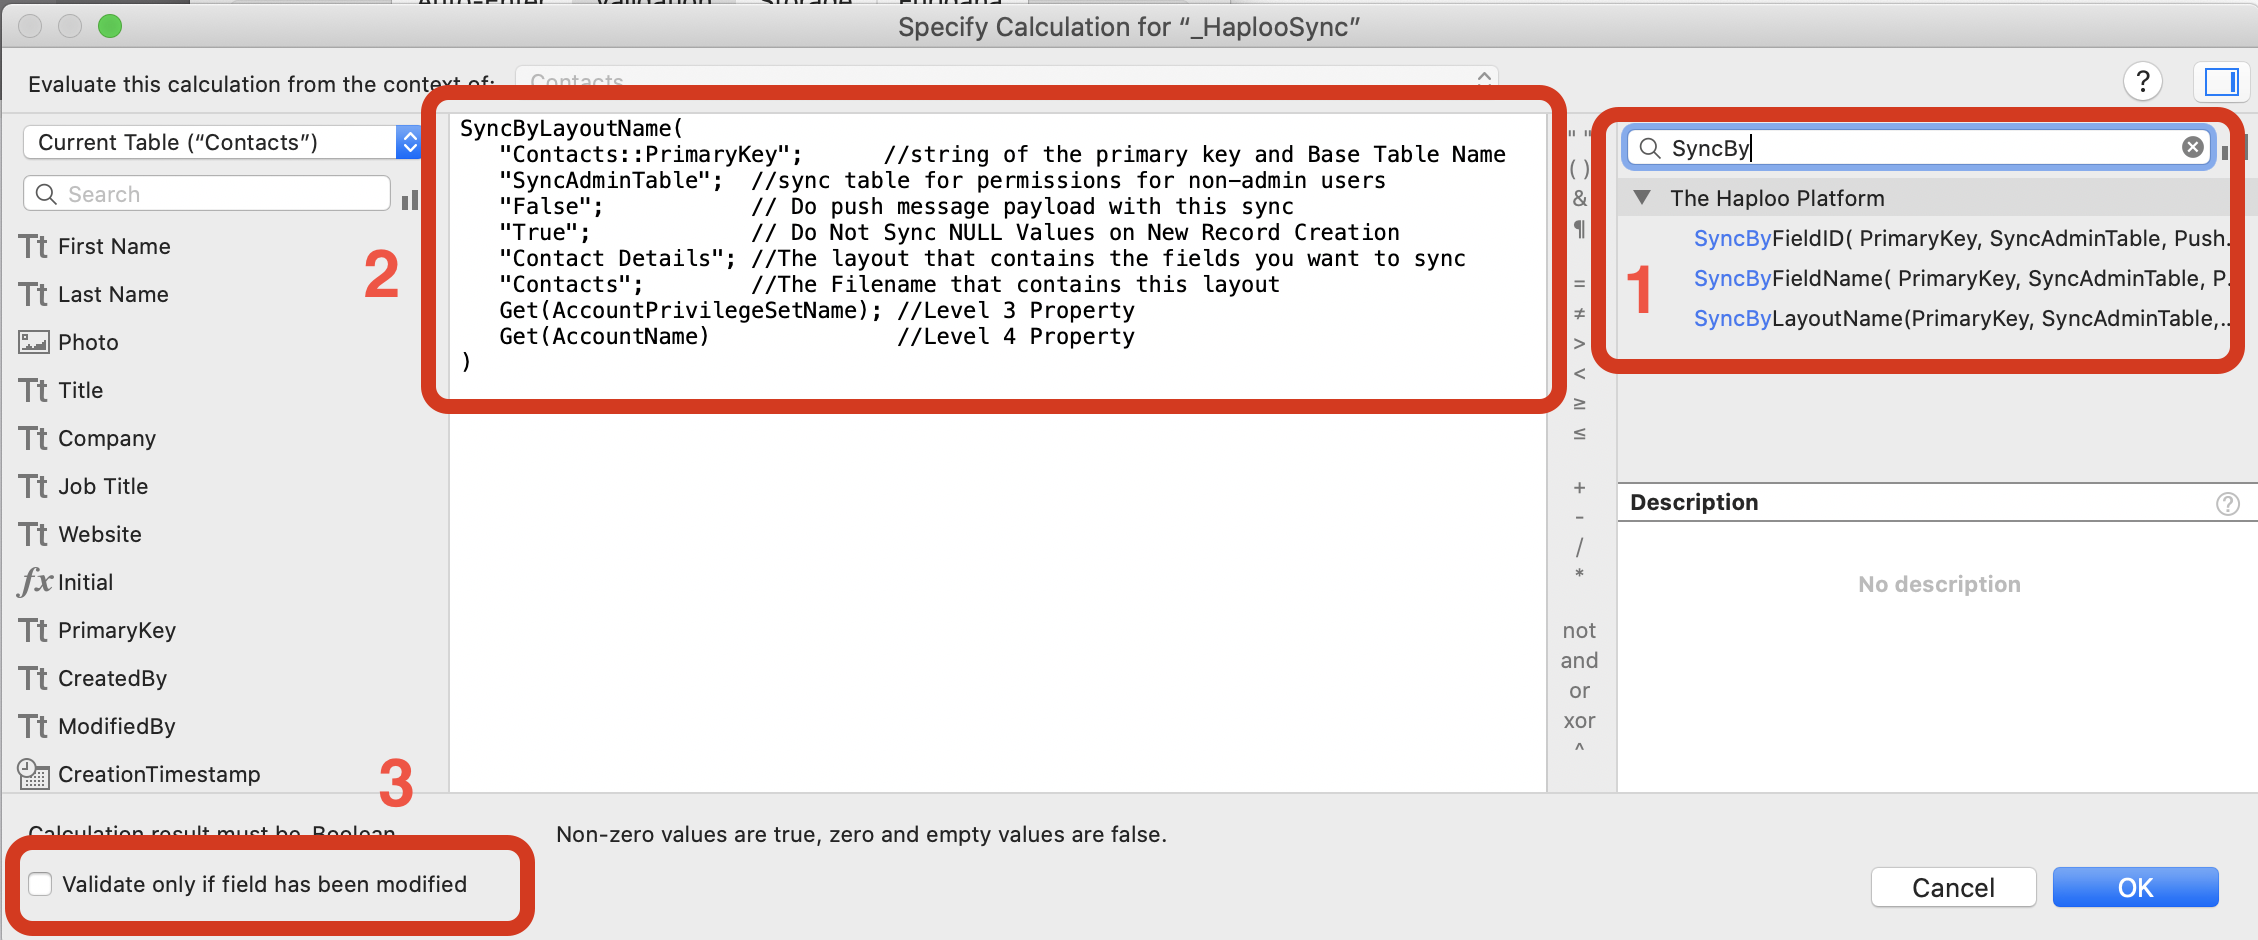
Syncable Field TypesJust a reminder, Haploo Sync only uses TEXT, NUMBER, DATE, TIME, & TIMESTAMP field types. Container, Calculation, and Summary fields are not needed or allowed - Click the Specify... button to configure these sync posting options in the calculation window. We currently offer three different modes for collecting and posting record creation and edits to the plugin. In this example we are using the SyncByLayout which uses a predefined FileMaker Layout to reference when evaluating which fields you'd like to use for the post activity. We cover these "posting mechanisms" functions in more detail HERE link to HaplooSyncPost Functions
SyncByLayoutName(
   "Contacts::PrimaryKey";      //string of the primary key and Base Table Name. Base Table must exist in the relationship graph.
   "SyncAdminTable";  //sync table for permissions for non-admin users
   "False";           // Do push message payload with this sync
   "True";            // Do Not Sync NULL Values on New Record Creation
   "Contact Details"; //The layout that contains the fields you want to sync
   "Contacts";        //The Filename that contains this layout
   Get(AccountPrivilegeSetName); //Level 3 Property
   Get(AccountName)              //Level 4 Property
   )
- Repeat the last 4 steps for each table that you'd like to post data from. Feel free to wrap the SyncBy() function that you choose with a Case, Let, or If statements to build out a really dynamic and robust posting logic for your solution. You may which certain users can only download data for a particular table or post only at specific times. Just alway remember Haploo Sync posting captures the current event / record edit transaction and not the actual or complete FileMaker Record being validated. Think about how Get(ModifiedFields) & Get(RecordOpenStatus) are being evaluted. These are the essential drivers for the SQL Statement construction that Haploo uses to replicate user data between devices.
6. Prep All Account Privilege Sets for Sync Rights.
At this point, your solution is capable of pushing new records, and edits to these records to the Haploo Cloud; however, in order to properly pull data down to complete the sync, your solution must offer sync mechanisms the ability to make all the required required changes that pulled sync operations may ask of the solution, regardless of the current logged in user's permissions set.
Step 1: Create a new table named: SyncAdminTable in every solution file. This means if you're using 3 FM Files, you must add this table to all 3 FM Files.
Step 2: Create ONE and ONLY ONE Record in this table!
Step 3: For each priviledge set in your solution, you must do the following:
1. Navigate to File > Manage > Security > [ Select a Priviledge Set ]
2. While editing the Selected Priviledge Set, under Data Access & Design section, click Records Dropdown menu
3. Now select, Custom Priviledges, in the list of Table Names, find SyncAdminTable entry.
4. Alter the View permissions for this table, by adding a limited... calculation.
5. The calculation will be (Just use double quotes and leave pass parameter empty string) :
HaplooPassthrough("")
6. Make this adjustment for each named priviledge set in your solution.
7. Test your solution
Now that you've made all of these changes to accomodate Haploo Sync into your solution, try to test each process or data creation flow to ensure that you do not receive any data validation errors. If you do happen to come accross a validation problem, there is a value or a field that is triggering this error. This error must be resolved before shipping or deploying your solution. Common problems: Data in a field does not strictly match the Field Type. This is very important when converting records changes into true SQL-T statements.
You've made it this far, you may want to check out these other great getting started articles:
Getting Started with Photo Sync
Using Haploo Continuous Integration for Updating Your Deployed Solution Files
Understanding Haploo Local Data Cache and Server Date Cache Operations
Configure your iOS SDK App Xcode Project for Sync & App Store Submissions